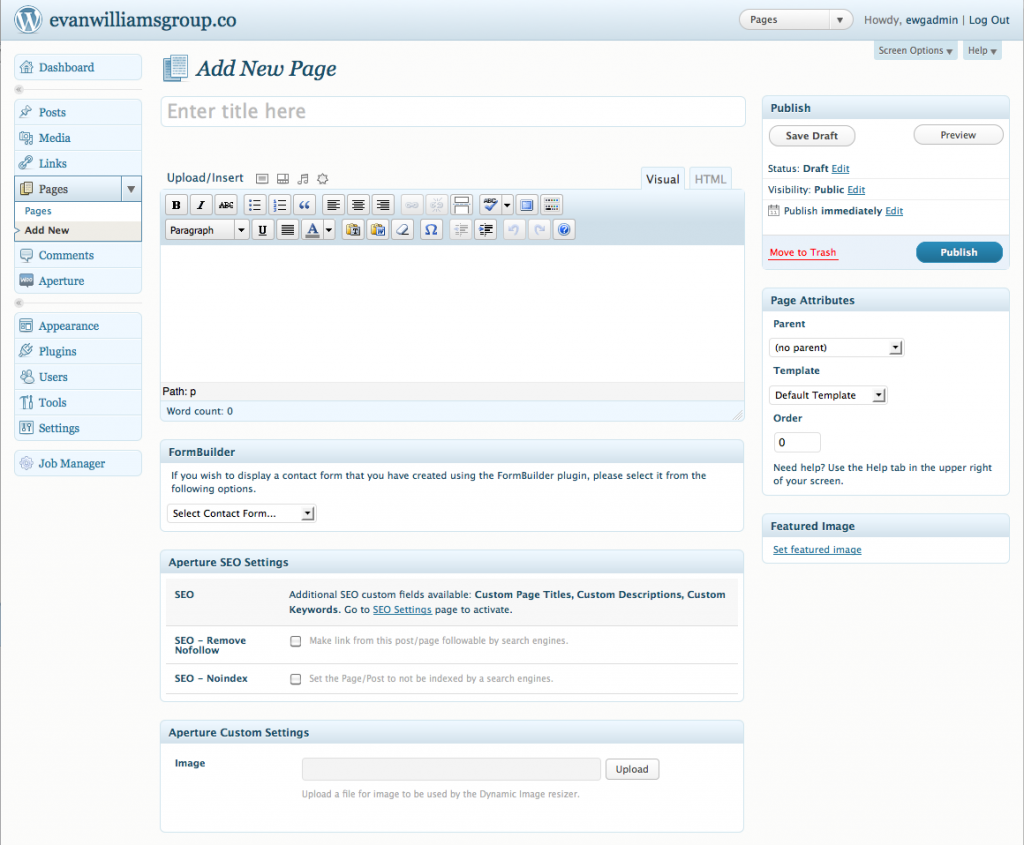
Add New Page
 This is the section where you can edit existing pages or add new pages to the site. The title you give each page will be the name that shows in the menu bar at the top of the site. The space here is limited so you can set up names in sub-categories if you require more static pages.
Select from the left Menu Bar under the section Pages: Add New, which will bring you to the screen shown on the right. From here you can go through each section and add the appropriate information.
In this section you can enter any details you would like on the page.
Always start at the top and complete each section as you create the page you would like to have.
Steps to Create a New Page:
- Enter Title Here
- Text Box: this is where you enter all your page information and format it how you would like it to look using the menu bars provided.
- Upload/Insert: the icons to the right of this text allow you to easily insert graphics to your page.
- Add an image
- Choose files to upload: select the file from your computer that you would like to upload. Ensure that the file is less than 128MB. After the file has uploaded you can complete each of the boxes that appear. Select the alignment and size of the picture.
- i. Use as Featured Image:
- This allows you to set this particular image as part of the slider on the homepage that rotates through images.
- i. Use as Featured Image:
- ii. Insert into Post
- This automatically places the image in the page that you are creating.
- To the right of the Upload/Insert icons there are two tabs: VISUAL and HTML, it is important that you are always in Visual unless you are familiar with programming in HTML.
- Skip the Spectrum SEO Settings & Custom Fields sections.
- Discussion:
- Allow comments: this will allow people to make comments on the page. Typically you would uncheck this for pages, but may allow for blog posts where you would like to have people comment.
- Allow trackbacks and pingbacks on this page: only leave checked if you have comments activated.
- Author: you can set who wrote each article/page here. If a user is set as an author, they cannot edit pages/posts created by other users.
- Spectrum Custom Settings: you can leave blank or experiment with in the future.
- Publish: we will come back to after next sections
10. Page Attributes:
- Parent: only set this to have a parent page if it will be a sub-category. This will make it easier to find in association with other pages in the future.
- Template: typically leave this as default template unless you are want the page to be different then choose one of the others. Each template has different page lay-outs which may work better for a specific item than the default.
- Order: typically leave as 0 unless you want to group them together in their listing according to rank.
11. Restrict Access:
- Only check this off if you want to restrict the page to be viewed only by people that are logged in as a user.
12. Featured Image: click on this if you would like an image with this page to be featured in the slider on the home page.
13. Publish:
- Save Draft: this is to be used if you are not quite ready to launch the new page
- Visibility: set this if you want the page to be restricted to who can view it.
- Publish Immediately: you can set the date when a page will be ‘live’ this is good if you have something that you need to have launched on a specific day and have the page created in advance.
- Move to Trash: deletes the page
- PUBLISH: takes your page live to the website.
- i. If you are editing a page after it has been created, this will be the UPDATE button.
* After you have created the page, you need to add it to the MENU. You can find the MENU tab in the APPEARANCE menu category on the left of the page. See image and instructions on next page.


